Tuesday, August 21, 2012
Successful Surgery
I'll spare you the photos of my arm. The Ulnar Nerve and trigger finger surgery is healing well. It may be a couple more weeks till I can get back to work but looks like I'll have a complete recovery.
Monday, July 23, 2012
Dunbar Wisconsin Vet Memorial
Just returned from Dunbar Wisconsin. This is an eagle I created for the Veterans Memorial they are building in their town park. It is a wonderful all volunteer effort.
Friday, June 29, 2012
Public Safety Bldg. Address
In case you want to see the sculpture in person it is at 2030 Arlington Ave. North in Duluth, MN
Duluth Public Safety Building Sculpture
I installed the plaque for the sculpture early this morning and took a few more pictures in the early morning light. We are now giving the studio a good and long over due clean up.
Tuesday, June 26, 2012
Duluth Public Art Project, Installed
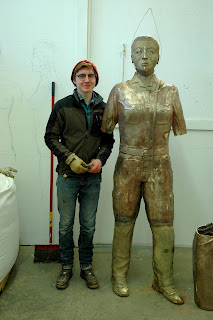
Yesterday we installed the two figures at the Public Safety Building in Duluth. One more trip is required to finish, we didn't bring the plaque along to install that too.
Monday, June 18, 2012
Duluth Public Art Welding Done!
I want to invite you all to the studio, Last Chance Fabricating, 17 Railroad Drive, Lutsen, MN this Saturday June 23 from 10 till noon. We are going to have a send off party for the big sculptures. We will be serving doughnuts (Worlds Best) and coffee.
The welding is finished. Now just a little more grinding and then sand blasting and patina.
The welding is finished. Now just a little more grinding and then sand blasting and patina.
Friday, June 8, 2012
Finishing Up
Wednesday, May 30, 2012
Assembling cast pieces
 |
| Summer intern Graham Johnson with the female Deputy |
Sunday, May 20, 2012
Video about the Duluth Public Art project
Karen Sunderman and Steve Ash created this video for The Playlist.
http://www.youtube.com/
http://www.youtube.com/
Tuesday, May 8, 2012
Visit from The Playlist
 |
| Steve Ash and Karen Sunderman of WDSE/WRPT along with Lester Morrison of Last Chance |
A few years ago Karen and Steve came to the studio to do a piece on our work here. You can see a portion of that show by clicking here. This video also shows Wayne Potratz my friend and mentor. I want to thank Karen and Steve for the terrific work they do on behalf of the art community in the north land. Having the exposure they are able to give us broadens our audience and gives us a sense of accomplishment.
It has been several weeks since I last posted but we have been working very hard. We have nearly all the casting done with only one mold failure. Not a bad ratio for the number of molds we have cast.
Friday, April 13, 2012
Duluth Public Art Progress, 13 April
Making good progress on the project. We are being extra careful on the mold making and adding insurance in the form of sand molds over our ceramic shell. This adds perhaps another hour per mold but insures we don't have to start from scratch if a mold fails.
 |
| Make shift blower. To dry the shell cores (inside the mold). I found a sleep apnea pressure device that blows a gentle 8 cfm, split the pipe and put ends into mold. Works great! |
 |
| Arms right out of the molds |
Friday, March 30, 2012
Duluth Public Art Faces and more
 |
| The female officers face |
 |
| male officer |
 |
| arm sections in the ceramic shell room with the first coat of liquid |
Here at Last Chance Fabricating we use a product called Shellspen. It is a very good product and makes the process easier because we don't have to keep our liquid silica mix in constant agitation. I did this for a number of years with an elaborate mixing machine and lots of difficulty if the power went out.
Sunday, March 25, 2012
Duluth Project Update
 |
| the wax heads ready for ceramic shell process |
 |
| back of sections, the red wax, called sprues, act to channel the molten bronze to the pattern |
 |
| the pieces after the first dip in the liquid silica |
.JPG) |
| second dip of liquid, allowed to drip off the excess |
 |
| subsequent dips of liquid are followed by dry coats of stucco in progressively coarse grades with 10 coats total |
 |
| the completed refractory shells are now de-waxed, creating a cavity in the mold where the wax was |
 |
| molds are placed in the kiln and brought up to 1800 degrees, that temp is held for one hour to vitrify the molds making them strong enough for the 2100 degree bronze |
 |
| Man's face right after breaking away the mold |
 |
| woman's face |
It has been a busy couple of weeks around the studio. We have poured three times with good results in spite of having my pyrometer (used to check the temperature of the molten bronze) die on me. Other troubles have been four trips to the dentist for a problem tooth and infection and smashing my head on a sculpture resulting in a gash on my forehead. Just your average times at the sculpture studio. I am, however, very pleased at the outcome of our efforts.
Friday, March 9, 2012
Ceramic Shell Molds
Here are 10 of the more than 30 molds we will need for the Duluth Public Art Project.
These are 3 leg sections (2 have been completed) and the badges and arm patches. These molds are half way through the dipping and stuccoing procedure. Next round of molds I will take a few more pictures to help explain the process.
When these are finished we will start pouring bronze and should be pouring twice a week for the next 4 weeks.
Wednesday, February 22, 2012
Preparing waxes for investment
 |
| Lester doing wax work |
 |
| body sections, some with sprues added |
 |
| wax heads and arms |
Thursday, February 2, 2012
Polytek Spray mold system
 |
| Removing metal shims, you can see the flange dividing the figure in half. After this step we sprayed on the rubber mold material. |
 |
| Spraying action shot. The loaded gun weighs almost 15 pounds. It was worth while to build the figures to be able to lay them down horizontally. Much easier to spray down and much less over spray. |
 |
| Lester using air pressure to help release the mold. |
 |
| Mold sections, even though we used air pressure to release we ended up peeling clay off the armature. Actually , this works very well as it's easier to reclaim the clay. |
 |
| Of the 20 molds we made this way we only broke one. The plastic material was easily repaired with a 2 part epoxy made for plastic repair. |
 |
| The face after peeling off the mold. This scrapes off the ears and damages the figure. No matter the molds are perfect. |
Wednesday, February 1, 2012
A more feminine Deputy
A much less bulky body, thinner face and more friendly expression although the harsh light hitting her face isn't the most flattering. Her pony tail doesn't show here either. If you look back in the blog the difference is apparent.
Thursday, January 26, 2012
Thank you Polytek
Molds are now finished on the male officer. The Polytek mold system worked very well.
 |
| Lester trimming the flange with a jig saw. |
 |
| Lester holding the first section of mold peeled off the clay, |
 |
| This shows a mold section, blue is flexible rubber, white is the plastic mother mold |
 |
| Stripping the clay from the armature. We save the clay for the next project. |
Wednesday, January 25, 2012
 |
| The other side of the piece. |
 |
| The arms set up and sprayed with the rubber. |
I definitely am glad I went through the trouble of making these figures sturdy enough to lay them down. It made spraying them much easier with far less wasted material. The shop stayed cleaner too. The gun loaded with spray material weighs about 15 pounds. It is very tiring to hold up for several hours at a time while working.
Subscribe to:
Comments (Atom)


.JPG)


