Thursday, January 26, 2012

Thank you Polytek

Molds are now finished on the male officer. The Polytek mold system worked very well.

The back half of the figure with the plastic mother mold sprayed on.  When we are working on the female figure I will try to get a volunteer to take some pictures of that process. With the two of us we can't take action shots, just too much going on.

Lester trimming the flange with a jig saw.

Lester holding the first section of mold peeled off the clay,

This shows a mold section, blue is flexible rubber, white is the plastic mother mold

All the molds fastened together with bolts. We drilled through the flange before peeling the molds apart. I managed to manhandle one of the molds and broke off part of the flange. No worries though it will still work just fine.

Stripping the clay from the armature. We save the clay for the next project.

Wednesday, January 25, 2012

The other side of the piece.
The arms set up and sprayed with the rubber.


This morning we sprayed on the plastic mother mold over the front half of the mold. That material goes on very quickly and sets up in a few minutes. We flipped over the sculpture and sprayed on the rubber material on the back half and sprayed the arms. Don't tell Lester but I forgot to spray release agent on one of the arms. That oversight will make getting the rubber off the clay a chore but won't hurt anything but my reputation. The rubber will cure overnight and we will then spray on the plastic mother mold.

I definitely am glad I went through the trouble of making these figures sturdy enough to lay them down. It made spraying them much easier with far less wasted material. The shop stayed cleaner too. The gun loaded with spray material weighs about 15 pounds. It is very tiring to hold up for several hours at a time while working.

Tuesday, January 24, 2012

Polytek Spray on rubber molds

Lester holding arm after we cut it off.  We tied and taped off the arms to keep  from deforming the surface.
This was a very stressful operation but worked out perfectly.

Figure without arms. This makes mold making easier and allows for better results,

Figure laid out to facilitate spray on mold. We supported figure in the middle to keep from deforming it.
We added shims to part the figure in half but I forgot to get pictures of that step.

After spraying, the tool in the foreground is used with cartridges for applying mold material.

Mold material applied, note the flange surrounding the figure creating a parting line for two halves of the mold.
Tomorrow we will be spraying on the plastic mother mold which will give form to the flexible rubber.
This was a stress filled day of very hard work. Everything worked as planned and tonight the rubber is curing so we can proceed to the next step.

Sunday, January 22, 2012

Modeling hands in clay


That's me working on hands today and a close up of one that is finished.

Yesterday Robin from Duluth Police Dept. and Steve from St. Louis County Sheriff's Dept. came up for a preview. They are happy with the progress and gave me the go ahead to start mold making.

Lester has been making molds already of the hardware that goes on the officer's belts. The goal is to have both the figures finished and in molds by the 4th of Feb.

Friday, January 20, 2012

Big Plasteline Figures


It's been a while since I have shown you a picture to put things in scale. This is the present form the Duluth project is in. Reworked the female figure quite a bit. She is more svelte now. A few details to go on the figures then the mold making can begin.
Representatives from Duluth Police Department and St. Louis County Sheriff's Office are coming to visit tomorrow. Hopefully they will be pleased.

Wednesday, January 18, 2012

Wax Patterns ready for investment


Shown here are the two S&W hand guns ready to be subjected to the refractory mold process. In the lost wax casting method the term is investment. What you see here are the two guns made from wax. The red material is wax as well and you see the two paper cups.

The cups form a funnel in the mold. The red wax attaching the cup to the gun is called a sprue, the little red wax from the butt of the gun and from the holster to the cup are vents. Imagine trying to pour water into a pop bottle, the difficulty is the air must rush out as fast as the water pours in. By venting we can rapidly pour bronze into the molds.

Everything you see here gets invested (covered) in refractory mold material. We use Shell-Spen, a liquid colloidal silica and sand to build up coats of the mold. When fully coated the material will be 1/4 of an inch thick. The wax will then be melted out of the molds, the molds heated to 1800 degrees then bronze poured in where the wax was. The result is everything you see here will then be bronze. The sprue with cup and the vents will be cut off leaving the gun.

I will take pictures of the process to help illustrate what I'm attempting to explain.

Monday, January 16, 2012

Today's progress

Missing is the badge and detail on the shirt patches.  I've decided to make separate molds for these and add them in the wax stage.

Shirt pocket with a pen.

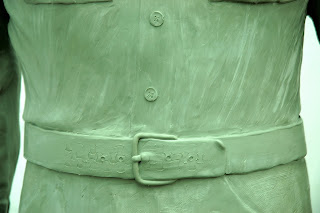
Belt with basket weave, again this texture will be easier to add to the wax.

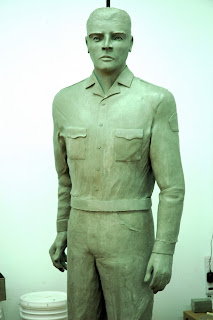
Made good progress today. I'm thinking the top half of the male figure is finished (except for the hands).

A more friendly officer


I softened his expression a bit by filling out his lips and giving him a hint of a smile. Pockets on the shirt are a bit small here and when I enlarge them he will get a pen in his pocket. The badge and patches on the shirt will be next.
Lester did a good job on the mold of the hand gun but will be detailing the wax more. The details are fussy to do but add so much to the personality of the figure. Our challenge will be to quit bumping into parts that are finished while working on other parts. The clay is soft enough to mark easily with finger prints.
The plan is to be ready to start mold making by the end of this week on this figure.

Monday, January 9, 2012

Smith & Wesson but bigger


Here is the service weapon for both of the figures. I need to put a strap over it but you get the idea. Again this is scaled 1.171 times larger than life sized. I can make one mold of this and use it for both figures.


I have this figure nearly finished. I need to add pockets to his shirt and the back of his pants and the badge and shirt patches.

Saturday, January 7, 2012

Rendering shirts in clay


More progress on the Duluth Project. I've spent the last week on attempting to get the shirts correct on the figures. Finding the balance of realism and representationalism. In the end simplicity is the best way, looking for drama and telling the story of the heroism of the officers. I have re-learned the old lesson of less is more, several times over.
The female figure is filled out more in the waist and I may be giving her breast reduction surgery today.